Sunday, January 17, 2010
Tuesday, December 15, 2009
ROSEMARY SPELT CRACKERS
I have had a few requests for the Rosemary Spelt Crackers that I made. They were SO yummy and fun to make. I had never made crackers before so I wasn't sure what I had gotten myself into, but it was surprisingly simple! AND, these crackers were REALLY good - I ate them with homemade hummus, but they are good just by themselves or with a little cheese, too!!!
I got this recipe from HERE, but I will copy and paste the recipe below so you can access it easily! Crackers are SO expensive to buy, especially if you are eating wheat-free or preservative-free. Plus, this dough is "soaked" overnight so they are easier to digest and easier for your body to get the nutrients from them!
ENJOY!
Homemade Rosemary Spelt Crackers
- 3 1/2 cups of spelt flour
1/4 cup of melted coconut oil
1 cup of water with two tablespoons raw apple cider vinegar vinegar (or you could use 2 tablespoons of whey, lemon juice, yogurt, buttermilk, kefir)
1 teaspoon of sea salt (plus extra for the top)
1 teaspoon of baking soda
2 heaping teaspoons of dried rosemary, if desired
1-The night before: Place the flour in a large bowl. Add the melted coconut oil and water and vinegar. Starting mixing with a fork or wooden spoon until it gets to stiff. Knead the rest of the flour in (you can do this right in the bowl if you want, or on the counter) using your hands until it forms a ball. It shouldn’t be too sticky, or to dry. You can easily adjust by adding a bit more water for a dry dough or a bit more flour for a sticky dough. Put back in the bowl and cover well. Leave out on the counter top overnight.
2- The next morning, flatten your ball out on the counter, using a little white flour, if needed to prevent sticking.
3-Sprinkle over the top the baking soda, salt and optional rosemary. Fold in half and knead gently until salt and baking soda are evenly mixed in. You are now ready to roll it out!
4-Preheat your oven to 425 degrees, and lightly flour a surface (I use a large wooden cutting board). I liked to roll out a quarter of the dough at a time, for more control. Roll out quite thinly (and as evenly as possible), using as much white flour, or arrowroot flour as you need to prevent sticking. The thinner you roll it out, the more crisp and crunchy it will be.
5-Carefully transfer over to a cutting board and cut out using either use a sharp knife or a pizza cutter. I make about 2 by 2 inch crackers, though I certainly don’t make them all the same size.
6-Place on a greased cookie sheet and prick with a fork. Lightly sprinkle with sea salt, coarse or fine, either is fine. *I used a baking stone and they turned out perfectly!
7-Bake for about 10 minutes and check. They will be done when they are browning slightly. Don’t overcook as they will become bitter. Cool on cooling sheets and enjoy! I like to store them in a glass jar on the counter. They are so pretty!
Chicken & Artichoke Bake
I have neglected my blog lately - - - sorry! I have been feeling the effects of the end of pregnancy....I'm ready for this baby to be born!!! We are due 12/31, but I've always felt it was going to come before Christmas....we'll see if I'm right or if its just wishful thinking.
BUT, it hasn't stopped me from trying a new recipe here and there. Here is what I made for lunch on Sunday - I was trying to avoid going to the grocery store and use what I had, so I found a recipe and make some changes to it....it was SUPER yummy! I think you'll like it! Even my kids ate it up!!!
CHICKEN ARTICHOKE BAKE
Ingredients
Directions
- Preheat oven to 375 degrees.
- Sprinkle chicken with salt, pepper and paprika to taste. Melt butter/coconut oil in heavy skillet and brown chicken on all sides. Remove to covered 9x13 inch casserole.
- Add mushrooms to pan drippings and saute. Add flour and gradually add stock or broth and sherry/wine. Season with rosemary; deglaze skillet.
- Arrange artichoke hearts among the chicken pieces and pour sauce over all. Cover and bake at 375 degrees F (190 degrees C) for 40 minutes or until tender.
This was REALLY, REALLY tasty - it is sort of "juicy", so when I make it again I'll probably serve it over quinoa or couscous, etc. ENJOY!!!
Friday, October 30, 2009
Homemade "Healthy" MOUNDS BARS
I found this recipe on another site that I love (www.thenourishinggourmet.com). They are "healthy" mounds bars made out of all-natural ingredients, including coconut oil! Coconut oil has been shown to be a great immune booster, not to mention the evidence that those who live in tropical climates and have a diet that is high in coconut oil are healthier, have less heart disease, cancer, colon cancer, etc.
The great thing is that you won't really even feel guilty when you eat them!! YUM!!! Here's a not-so-good picture of the smaller ones I just made for our "Pastor's Wives Retreat" that I am going to Seattle for with Kristyn Brown and Karla West tonight (mostly this "retreat" will involve eating, shopping, movies, etc) :
"Mounds" Candy Bars
1 1/3 cup unsweetened coconut flakes
1/2 cup of coconut oil
1/4 cup honey
1 tsp almond extract (i didn't have this and didn't use it)
almonds (about 36), left whole OR chopped
1. Melt coconut oil and honey over low heat until just melted. Whisk to combine. Add the almond extract and coconut flakes.
2. Now take out muffin tins (I use the small ones) - in each compartment, place 2 or 3 almonds or divide the chopped almonds. Then divide the coconut mixture over each compartment, making sure you get an even mixture of coconut flakes and coconut oil. Place in freezer on a flat surface and freeze until hard (about 30 minutes).
NEXT:
3/4 cup cocoa powder (not dutch cocoa)
1/4 cup honey
1 cup coconut oil
1 Tbsp Vanilla extract
3. Combine these ingredients in a glass 2 cup measuring glass and place in a pot of simmering water. Heat until everything is just melted and remove from heat. Either wisk briskly or use a hand held blender to combine well.
4. Take out the frozen coconut flake mixture and divide your chocolate mixture over each compartment.
5. Freeze until hard.
ENJOY!!!
Thursday, October 29, 2009
A natural version of Tamiflu??
OKay, so I know most of us are dealing with the H1N1 flu going rampant in our communities. We made the decision not to vaccinate for that (or the regular flu, for that matter) and so we're keeping healthy in other ways - you can read my other blog (search for it) on natural immune boosters.
BUT, yesterday I came across some information on a natural alternative if you DO start feeling the symptoms of the flu. Its called ELDERBERRY SYRUP....its all-natural and therefore is free of the nasty side effects of other anti-virals like Tamiflu. I've been looking into the safety of taking while pregnant and some sources are saying "yes" others say "ask your healthcare provider"....so if I need to take it I will call and ask first. Here are some studies on the effectiveness of Elderberry Syrup which were pretty impressive.....
Try elderberry syrup to fight the flu, more
You can use it preventatively or when you actually feel the flu coming on - just like Tamiflu, it says to start using it regularly within 24-48 hours of the onset of symptoms.
I bought some yesterday and I'll let you know how it works (although hopefully we won't have to use it!!)
Monday, October 19, 2009
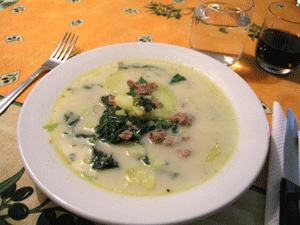
Tuscan Zuppa
If you love the Olive Garden, you will love this soup. I totally stole this from someone at our church - Jan Cichowski (actually she gave it to me!). And then I found pictures online with the same recipe!!! So, its not authentic nor are the pictures of me preparing it. BUT, you will LOVE this soup - its super yummy. I tend to leave out the red pepper flakes so that my kids will actually eat this!
You'll see it calls for bacon...I am careful to always purchase nitrite-free bacon. Why? Nitrites are found in lunch meats and most all processed meats, and they are shown to cause stomach/pancreatic and prostate cancer - or at least increase the liklihood of those. To read more about that, click HERE. I would also just prefer to have my food, and especially the meat I use, be un-messed-with, ya know?! SO, bring on the bacon and sausage (nitrite-free, of course) and ENJOY!!!
INGREDIENTS
- 1 lb ground Italian sausage
- 1½ tsp crushed red peppers
- 1 large diced white onion
- 4 Tbsp bacon pieces
- 2 tsp garlic puree
- 10 cups water
- 5 cubes of chicken bouillon
- 1 cup heavy cream
- 1 lb sliced Russet potatoes, or about 3 large potatoes
- ¼ of a bunch of kale
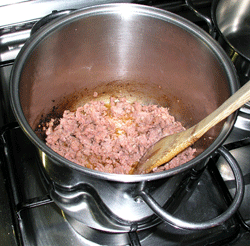
- Sauté Italian sausage and crushed red pepper in a large pot. Drain excess fat, refrigerate while you prepare other ingredients.
- In the same pan, sauté bacon, onions and garlic for approxiamtly 15 mins. or until the onions are soft.
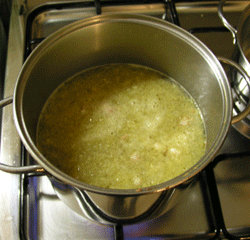
- Mix together the chicken bouillon and water, then add it to the onions, bacon and garlic. Cook until boiling.
- Add potatoes and cook until soft, about half an hour.
- Add heavy cream and cook until thoroughly heated.
- Stir in the sausage.
- Add kale just before serving. Delicious!
Buon appetito!
Sunday, October 18, 2009
Food intolerances and a great recipe for Gluten-Free Bread for the BREAD MACHINE
About a year and a half ago, I had suspicions that our son Levi may have a food allergy/intolerance of some sort. He had sandpapery-feeling skin, especially on his torso, very large tonsils, daily complaints of stomachaches and irregular bowel problems. On the recommendation of a friend, I took him to a local Naturopath Doctor. With a background as an RN, I was a little hesitant with the whole naturopath thing, but I was pleasantly surprised!
The first thing I noticed was that they spent a LOT of time with us - as in almost an HOUR total! I was impressed. I took Julia in as well as I figured if I was getting one of them tested I should just do both (and me, too, while they were at it!) She listened, asked questions, took notes and addressed my concerns.
Then, a simple finger prick (which both of my kids tolerated without any tears or cries of "ouch") was enough to squeeze a little blood on 3 different strips. Those were sent in to test both the IgE and IgG levels, or antibodies. They tested for 96 different foods using the ELISA testing - you can read more about the IgE and IgG antibody testing HERE. I should mention that IgE antibodies indicate IMMEDIATE, more serious reactions, and none of us had any of those. IgG antibodies, on the other hand, are "delayed reactions" - think along the lines of something your body doesn't tolerate well and the more you eat of it the more it stresses your body out. It wears down your immune system over time and can likely cause chronic health problems.
A week or two later, we went for a followup appointment to discuss the results....the 3 of us were free from any IgE reactions. But, as for IgG reactions, what we found was that there was some wheat/gluten intolerance in Levi (on the lower side, but we had cut out wheat/gluten for about a month or two prior to that) and that BOTH of my kids had HIGH-level chicken egg reactions, to both the egg yolk and egg white. Very interesting. I was sad, but not surprised to see my IgG levels for all dairy products come up in the mild/high levels, along with a low/mild reaction to chicken eggs. Due to my myriad of sinus problems growing up and into adulthood, the Dr had suspected before I got my results back that dairy was likely the issue.
After finding these results out, we went ahead and continued cutting out wheat/gluten for a while, but also eliminated the use of chicken eggs. Because the protein is different, they suggested using duck eggs in baking, which I have incorporated without too much difficulty due to the fact we have friends from church who have an over-abundance of duck eggs!!!
Gradually, we have added wheat/gluten back into our diet - I have found that Levi seems to be okay as long as he doesn't have TOO much...so we just try to really limit it at home and so if he has it other places it doesn't seem to bother him too much.
After I cut out dairy, my results were amazing - no more gastrointestinal issues, no more post-nasal drip, and I have been FREE of sinus infections for almost 2 years (prior to that I would get them at least 3 times a year). AMAZING! After eliminating it for a while, I do find that I can tolerate a moderate amount of yogurt and cheese without too much problem, which is good, because I REALLY like cheese!
With these changes along with eating healthy, whole, natural foods when at all possible, I have also noticed that we don't get sick very often - and if we do, our immune systems are a bit stronger so the symptoms are more mild and we fight it off quicker!
Whew, so, after all of that, I have a great link to a Gluten-Free Bread that you can make in your bread machine! YUM! I typically change the following:
- use 1/2 cup millet flour instead of 1/4 millet and 1/4 garbanzo bean flour
- use coconut oil instead of canola oil
HERE IT IS:
Subscribe to:
Posts (Atom)